
CrowdStrike ($CRWD) Trading Plan: The Exact Levels for the Next Big Move
Is CrowdStrike ($CRWD) priming for an institutional breakout post-split? Discover the precise bull vs bear analysis, risk management rules, and key trading levels.
STOCK ANALYSIS
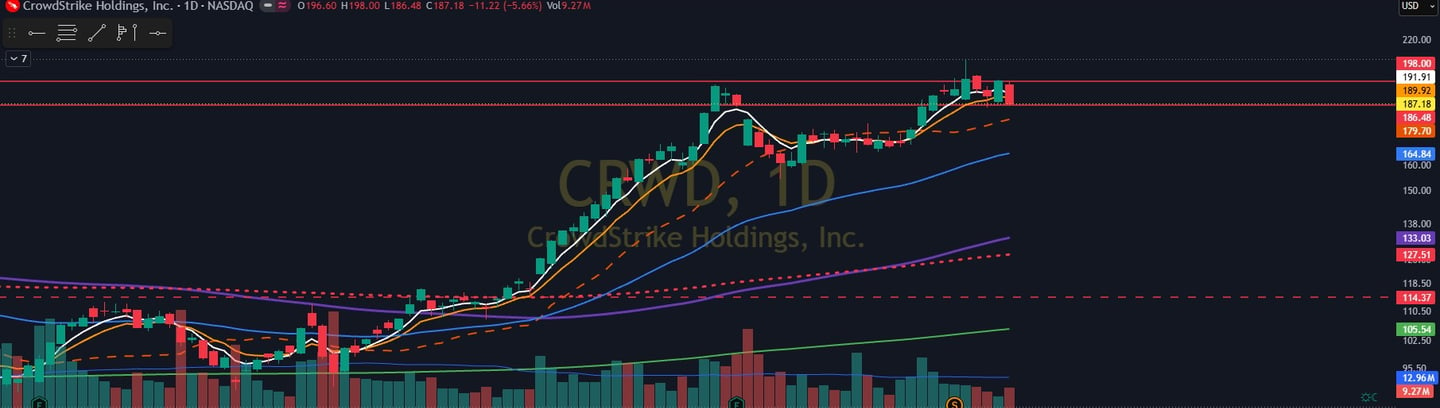
TABLE OF CONTENTS:
Why is CrowdStrike ($CRWD) Trending?
CrowdStrike ($CRWD) has re-emerged as a high-conviction focal point for institutional desks and short-term momentum traders alike. A powerful confluence of robust fundamental execution and structural market mechanics has recently triggered a sharp expansion in price and relative volume. Understanding these precise macro and micro drivers is essential before deploying capital into the current tape.
The 4-for-1 Stock Split: Enhancing Liquidity and Retail Order Flow:
The primary structural catalyst driving recent tape velocity was the successful execution of the company's 4-for-1 stock split. By lowering the nominal share price into a highly active trading zone, management has effectively democratized access to the equity. This structural adjustment has dramatically accelerated retail order-flow absorption, lowering the barrier of entry for retail options buyers and significantly deepening underlying market liquidity.
Next-Gen AI Adoption: Rocket Fuel Behind Raised FY2027 Guidance:
Beyond structural changes, CrowdStrike's fundamental enterprise narrative is experiencing massive acceleration due to the rapid deployment of its new AI Detection and Response (AIDR) engine. Large-scale corporations are aggressively consolidating their disparate cybersecurity stacks onto the core Falcon platform. This enterprise traction has translated directly into explosive financial metrics:
Record ARR Acceleration: The organization recently locked in a stunning $256 million in net new Annual Recurring Revenue (ARR).
Raised Forward Guidance: Management confidently adjusted its full-year FY2027 revenue projections upward to approximately $5.9 billion.
Ecosystem Monopolization: Enterprise clients are rapidly appending identity security and zero-trust data modules onto existing infrastructure, vastly increasing net revenue retention.
Market Maker Mechanics: Volatility and Delta-Hedging Pressures:
As institutional volume sweeps into the post-split equity, market makers have been forced to continuously re-hedge their positions to maintain delta-neutral portfolios. This mechanical buying pressure heavily fueled a prominent multi-day winning streak, exposing structural imbalances in the order book. With elevated implied volatility and shifting delta profiles across the new options chain, $CRWD is presenting a textbook environment for sophisticated swing and day trading strategies.
Why is CrowdStrike ($CRWD) Trending? Institutional Accumulation Meets Structural Catalysts
A comprehensive multi-horizon trading setup requires an objective look at both sides of the tape. While the momentum remains firmly in the hands of buyers post-split, structural headwinds and valuation constraints continue to loom. Decoupling the secular growth story from market reality reveals a sharp contrast between long-term institutional accumulation and near-term structural risks.
The Bull Case: Structural Ecosystem Moats and Margin Expansion:
The fundamental argument for sustained equity appreciation rests entirely on CrowdStrike's unmatched enterprise stickiness. Despite past sector rebalancing and historical infrastructure challenges, the underlying platform metrics indicate that corporate cybersecurity budgets are actively consolidating around the Falcon architecture.
Exceptional Unit Economics: The company continues to sustain dominant subscription gross margins of 81%, reflecting massive pricing power across its core enterprise tiers.
Trefis
Accelerating Platform Stickiness: Cross-selling velocity remains highly potent, with a rising percentage of institutional clients deploying five, six, or seven distinct cloud modules concurrently.
Aggressive Upward Guidance Revisions: Wall Street analysts have rapidly adjusted their consensus targets upward following the company's robust Q1 performance, anticipating full-year revenue expansion toward $5.95 billion.
High Net Revenue Retention: The integration of AI Detection and Response (AIDR) modules has dramatically increased the lifetime value of existing enterprise accounts, insulating the revenue stream from macroeconomic churn.
The Bear Case: Premium Valuation Multiples and Executed Insider Liquidation:
Conversely, the technical and fundamental bear case highlights that the stock's massive 210% multi-month rebound has pushed its valuation into an extreme territory. At these elevated levels, any minor operational deceleration or macroeconomic friction could trigger a sharp, violent repricing in the open market.
Extremely Rich Valuation Multiples: The equity trades at a premium forward price-to-sales multiple that leaves virtually zero margin for error regarding future earnings execution.
Aggressive Insider Selling Regimes: Automated Form 4 filings reveal consistent insider selling programs from top executive leadership, including the CEO and CFO, which can act as a persistent overhead supply barrier.
GAAP Profitability Disconnection: While non-GAAP operating income and free cash flow generation remain robust, aggressive expansion expenses and stock-based compensation continue to compress GAAP operating profit margins.
Heightened Post-Split Volatility: The influx of high-leverage retail options volume often causes temporary delta-hedging imbalances, rendering the equity susceptible to sharp, algorithmic flushes.
CrowdStrike ($CRWD) Bulls vs. Bears Analysis
This tactical game plan is engineered off Friday's closing structure to provide clear, objective boundaries for the upcoming week. Because this framework is compiled over the weekend, execution must rely strictly on dynamic intraday price acceptance rather than front-running the market open. By mapping these exact technical inflection points, we can eliminate emotional bias and trade directly against institutional order flow.
The Technical Key Level Map: Defining the Value Zones:
Must-Hold Pivot Support: $186.40 — This is the definitive line in the sand separating a bullish continuation posture from immediate structural failure.
First Upside Momentum Test: $191.20 — A critical intraday inflection point where market makers must actively absorb overhead selling pressure.
Intermediate Resistance Tier: $194.71 — The secondary supply zone where short-term swing traders are highly likely to distribute inventory and lock in initial gains.
Macro Breakout Trigger: $198.00 — A clean reclaim of this level clears a major structural resistance block, setting the stage for an aggressive velocity squeeze.
Extended Macro Targets: $201.37 and $209.50 — The ultimate open-air extension targets where price can accelerate rapidly due to a lack of historical overhead supply.
Structural Invalidation Level: Below $186.40 — Sustained candle closes under this zone break the near-term bullish market structure completely.
Primary Downside Target: $180.24 — The next major institutional liquidity pool expected to attract aggressive buyers if the primary support fails.
Structured Scenario Planning: If-Then Contingencies
Scenario A: Bullish Continuation (Support Defense):
If $CRWD maintains structural integrity above $186.40, the dominant market bias remains firmly constructive. Traders should look to accumulate long exposure on shallow intraday pullbacks, provided the tape confirms that buyers are actively defending this liquidity pool. The initial target for this defensive accumulation play is a retest of $191.20.
Scenario B: Momentum Confirmation (Price Acceptance):
If the price aggressively reclaims and builds value above $191.20, it signals a clear expansion of institutional demand. Long positions can be safely added or held, assuming relative volume remains elevated to validate the move. The next upside targets for this momentum acceleration phase rest at $194.71, followed closely by $198.00.
Scenario C: Breakout Extension (Squeeze Phase):
If the equity breaks above $198.00 with surging volume, treat the move as a highly calculated breakout expansion rather than an emotional chase. This zone marks a structural void where trapped short-sellers may be forced into rapid liquidation, fueling a swift extension toward $201.37 and ultimately $209.50.
Scenario D: Trend Failure and Invalidation:
If $CRWD breaks down and prints consecutive hourly candles below $186.40, the entire long thesis must be immediately abandoned. Forcing long positions in this environment risks absorbing heavy institutional distribution. Expect the tape to drop rapidly into the next major supportive pocket near $180.24.
Step-by-Step Trade Execution Rules:
Rule 1: Maintain an exclusively bullish operational bias if, and only if, the price action prints clear structural value above the $186.40 pivot.
Rule 2: Utilize successful intraday tests and bounces off $186.40 to scale into long risk, treating $191.20 as the primary scaling or initial profit-taking milestone.
Rule 3: Trail protective stop-losses higher once $191.20 transitions from resistance into a verified floor, steering the core position toward $194.71 and $198.00.
Rule 4: Treat a clean, volume-backed break above $198.00 as the formal green light to hold for the macro extension targets of $201.37 and $209.50.
Rule 5: Implement immediate capital preservation protocols if the equity drops below $186.40, utilizing the $180.24 level as the logical target for potential short-hedges or downside scalp setups.
Risk Management Note and Key Decision Points:
The single most important decision matrix for this entire setup centers entirely on the $186.40 zone. Above this technical line, the internal mechanics of the order book actively favor an upside continuation pattern.
If this support is lost, the chart instantly shifts from a "buy-the-dip" posture into strict "protect-capital" mode. Traders must manage risk defensively, avoid catching a falling knife, and respect the broader market's shift in trend direction.